Kia Forum banner

Full Stereo (less head unit) installation tutorial

111K views 55 replies 27 participants last post by  KiaFamily1416  
#1 ·
Since I have finished my full audio overhaul (less the head unit), I thought I would share my experience and offer insight to all those attempting to do the installation themselves. Keep in mind I am not a professional, so there may have been “better” ways to accomplish what I did, but I feel I did a good job. There are still some minor tweaks I would like to do like channel level adjustment and whatnot, plus eventually lay down some more Dynamat, but I am currently quite content with the system I put in.

Keep in mind re-installation for anything is just the reverse of removal, hence why I not going to cover it.
 
  • Like
Reactions: KiaFamily1416
#2 · (Edited)
Front Door Panel Removal:

Tools needed:
Normal flat head screwdriver, wrapped in electrical tape to avoid damaging panels
Jeweler’s flat head screwdriver
Philips head screwdriver

There are 3 screw locations on the front doors. Each one has a cover over the screws. The door handle has the black cover behind the lever, use the normal flat head screwdriver and pry from the side with the lock or pivot end of the lever. The next screw is on the “pull” section of the door where you put your hand in to close the door. Use the jeweler’s screwdriver here to pry up the “open” section. The final screw is located along the side of the door panel, covered by a small plastic circle piece. Use the jeweler’s screwdriver here and pry that center round piece out to expose the screw. All 3 screws are Philips head.

Image

Image

Image


Once the screws are removed, there is a small slot on the bottom of the door panel. Use your tape-wrapped screwdriver in here to begin prying the door panel. All that holds the door are blue push pins. Slowly remove the door by popping out the pins by pulling on the door. Do not try to “rip” it off or you risk damaging the pins. I did not find a panel remover tool effective for this area. See below for a picture of the door panel removed, and a view of the pins in the panel.
Image
 
  • Like
Reactions: KiaFamily1416
#4 · (Edited)
Rear Door Panel Removal:

Tools needed:
Normal flat head screwdriver, wrapped in electrical tape to avoid damaging panels
Jeweler’s flat head screwdriver
Philips head screwdriver

There are 4 screw locations on the rear doors. Each one has a cover over the screws. The door handle has the black cover behind the lever, use the normal flat head screwdriver and pry from the side with the lock or pivot end of the lever. The next screw is on the “pull” section of the door where you put your hand in to close the door. Use the jeweler’s screwdriver here to pry up the “open” section. The final 2 screws are located along the side of the door panel, covered by a small plastic circle piece. Use the jeweler’s screwdriver here and pry that center round piece out to expose the screws. All 4 screws are Philips head.

Image

Image

Image

Image
 
#5 ·
Once the screws are removed, there is a small slot on the bottom of the door panel. Use your tape-wrapped screwdriver in here to begin prying the door panel. All that holds the door are blue push pins. Slowly remove the door by popping out the pins by pulling on the door. Do not try to “rip” it off or you risk damaging the pins. I did not find a panel remover tool effective for this area. See below for a picture of the door panel removed, and a view of the pins in the panel.
Image

Image
 
#6 · (Edited)
Rear Seat Removal:

Tools needed:
Socket Wrench
14MM socket (other countries may have a standard unit equivalent
½” socket (If I remember correctly), 13MM also works in a pinch

Fold down the rear seat (I only did the right side, passenger side). You will find two bolts holding the seat back. Remove those two bolts (one is already removed in the picture)
Image

Remove the tilt mechanism on the passenger side as well, held by 13MM or ½” bolts. Rotate the piece to have access to either bolt. Picture shows the piece removed.
Image

To remove the bottom cushion, the front is clipped in, simply pull to remove the 3 clips along the front. To remove the back, it is held by 1 14MM bolt.
Image

Image

After that bolt is removed, pull the seat forward and out of the vehicle.
 
  • Like
Reactions: KiaFamily1416
#7 · (Edited)
Rear panel removal (subwoofer and amplifier access)

Tools required:
Philips head screwdriver
Socket wrench
10MM socket

Start by removing the cargo cover (pull up and out), and then the Styrofoam cargo stray underneath (if you have one). After that, remove the center piece where the latch is for the rear hatch door is. There are 3 plastic screws in there. The screws do not need to be pulled all the way out. The screws only screw into a push pin which expands the plastic pieces out to hold them in place, they are not “real” screws.
Image

Image


After the screws are out, pull out this section (held by push pins). This view shows the bottom side of that piece.
Image
 
  • Like
Reactions: KiaFamily1416
#8 ·
It is probably easier if you remove the spare tire, but I did not. Pull out the spare tire jack and wrench. Remove the two 10MM bolts holding the spare jack holder. Remove the spare jack holder.
Image

Image


Remove the 3 screws along the left side of this panel in the trunk area.
Image
 
  • Like
Reactions: KiaFamily1416
#9 ·
Remove the screw shown in the center if this picture (is only accessible when the rear seat cushion is removed.
Image

Remove the trim in the door entry, simply pull up (push pins).
Image


Remove the screw found underneath the door entry trim.
Image
 
#10 ·
After all 5 screws in total are removed, begin pulling the panel off, held by push pins and plastic “lips”. Below is the back side of the panel and the view without it.
Image

Image
 
#11 · (Edited)
Subwoofer removal/installation

Tools needed:
Philips head screwdriver
Whatever you need for the new screws that came with the woofer
Silicone (optional)
Crimpers/wire strippers if you remove the stock connector
Speaker wire

Remove the original subwoofer by removing the 4 Philips head screws and disconnecting the white connector. See below for the internal view of the box. I measured 4” for the depth to the plastic bits protruding on the “round” part on the inside. I believe it is about ¼ to ½” deeper to the base of the box.
Image


The subwoofer I used is a Polk Audio MM840 (single voice coil). The fit is almost perfect. The mount depth is 4-1/8” without the gasket, just shy of 4” with the gasket. There was no issues with bottoming out. When I mounted it I used silicone to help seal up the areas that I felt were lacking in seal. Due to the shape of the box the mounting area is not completely flush, but fits fairly well. My order of mounting was: Cut a sufficient length of speaker wire and attach to the terminals on the woofer, silicone the box mounting area, mount the sub and gasket, screw into place. I cut off the factory connection to the subwoofer as I was using my own wires. I did not trust the stock 18gauge wires to handle 200+watts RMS.
Image

Image

Image
 
#12 · (Edited)
Front Speaker Installation

Tools required:
Wire crimpers/strippers
Dremel with cutting disc, or something to cut plastic
Knife or jeweler’s screwdriver
Philips head screwdriver


My method of speaker installation was to utilize the factory mounts and just remove the woofer. These are honestly the weirdest setup I have ever worked on for speakers. Peel off the woofer cone from the edges using a knife or thin jeweler’s screwdriver to get started.
Image


Use your dremel with cutting disc or whatever you are using to cut the 5 plastic mounts on the inside. Shown below is the speaker removed, and what is left over.
Image

Image


From here I removed the factory connector on the mount and cut it off. I drilled a hole in the mount to run the wires inside and crimp the new speaker’s quick connect terminals. I drilled a second hole to run the tweeter wires up as well since my speakers connect the tweeters to leads off the speaker.
Image
 
#13 ·
I found the speakers weren’t fitting perfectly flush on the mounts, so I used two sided foam tape around the edge of the mounting area to help fitment and a bit of seal.
Image


After everything is prepped, mount your speaker, connect the wires and screw it in.
Image


I did not take pictures of the tweeter. I removed the factory tweeter entirely by removing the mount with two Philips head screws, and removing the connector. I cut off the connector as I would not be using it anymore. I flush mounted the new tweeters in the top corner of the door. Look up flush mounting on a search engine for further instructions regarding that.
 
#14 · (Edited)
Rear Speaker Installation

Tools required:
Wire crimpers/strippers
Dremel with cutting disc, or something to cut plastic
Knife or jeweler’s screwdriver

My method of speaker installation was to utilize the factory mounts and just remove the woofer. Peel off the woofer cone from the edges using a knife or thin jeweler’s screwdriver to get started.
Image


Use your dremel with cutting disc or whatever you are using to cut the 5 plastic mounts on the inside. Shown below is the speaker removed, and what is left over.
Image

Image


From here I removed the factory connector on the mount and cut it off. I drilled a hole in the mount to run the wires inside and crimp the new speaker’s quick connect terminals.
Image
 
#15 ·
I found the speakers weren’t fitting perfectly flush on the mounts, so I used two sided foam tape around the edge of the mounting area to help fitment and a bit of seal.
Image


After everything is prepped, mount your speaker, connect the wires and screw it in.
Image
 
  • Like
Reactions: iduelfortaco
#16 · (Edited)
Running the power wire(s)

Tools required:
Knife and/or wire stripper
Crimper or pliers for large connectors

With panels and seats already removed, this is much easier. I utilized the factory grommet near the steering shaft. Cut a small slit in the grommet and run the wire however works for you. I ran mine from the inside to outside. Keep in mind my install does not show the second wire installed for my line out converter which was done after I took pictures. Hide all wires under panels or carpet if you can to keep it looking clean. All the plastic all the way to the back is just held by push pins, so pull any of them off that you need to. I personally removed them all. I let the power wire run under the rear seat for easy access in case I ever need to get to it. Crimp your wires and connect to the battery as you see fit (not sure if any screws are better than the others. Use an adaptor if you like.
Image

Image

Image

Image
 
#40 ·
Running the power wire(s)

Tools required:
Knife and/or wire stripper
Crimper or pliers for large connectors

With panels and seats already removed, this is much easier. I utilized the factory grommet near the steering shaft. Cut a small slit in the grommet and run the wire however works for you. I ran mine from the inside to outside. Keep in mind my install does not show the second wire installed for my line out converter which was done after I took pictures. Hide all wires under panels or carpet if you can to keep it looking clean. All the plastic all the way to the back is just held by push pins, so pull any of them off that you need to. I personally removed them all. I let the power wire run under the rear seat for easy access in case I ever need to get to it. Crimp your wires and connect to the battery as you see fit (not sure if any screws are better than the others. Use an adaptor if you like.
Image
I presume you fused it up by the battery. The smell of burnt human is hard to get out of the upholstery.
 
#17 · (Edited)
Running Ground Wire(s)

Tools required:
Drill
Screw(s)
Crimper
Wire stripper or knife

To ground, I find you can drill into anywhere around the spare tire tub and get what I found to be a good connection. Simply drill, crimp your connector onto your wire, and bolt it down with a screw that is not painted. Ensure where you drill there is nothing below you don’t want to drill into. Mostly anywhere in the spare tire tub was pretty safe, I had no issues. Below is a picture of the amp ground wire run.
Image
 
#18 · (Edited)
Amplifier installation

Tools required:
Crimper/wire stripper
Solder (option 1)
Butt connectors (option 2)
18 gauge speaker wire
Line out converter (Cache COE6 or Audiocontrol LC6i work well)


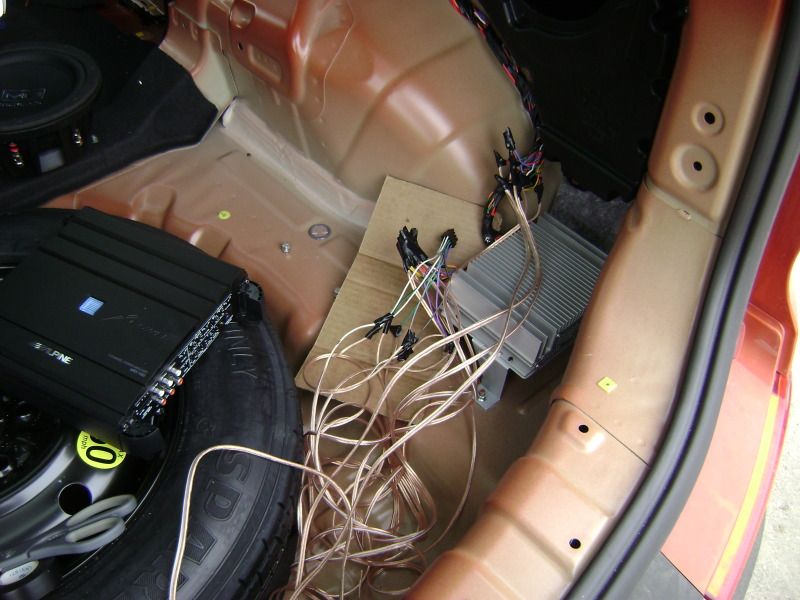
This part of the installation was a bit sketchy. Wire diagrams didn’t match up perfectly for some reason, so I used the test as you go type method since I had the amp already pre-wired. First I cut all the wires at the 12 wire connector on the amplifier. I added sufficient lengths of speaker wire to both the wires now coming out of the 12 wire connector to the amp, and also to the wires that were now cut from the amp (leading to the speakers). I soldered and electrical taped all my connections to ensure they would never disconnect. Butt connectors are another option here, and probably quicker too lol, but I don’t trust them completely. Although the wiring shown was my initial setup and was later changed the basic idea can be seen here:
Image


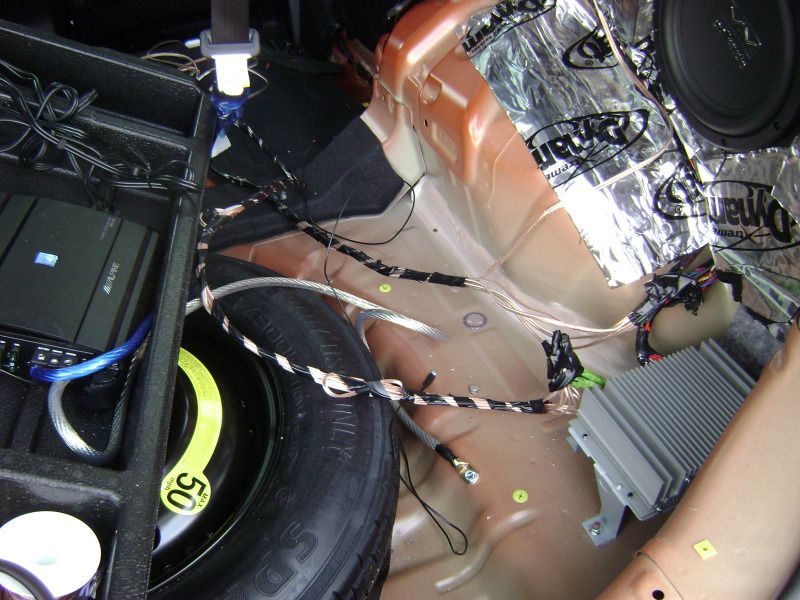
And then the final wiring with all wires wrapped together neatly:
Image


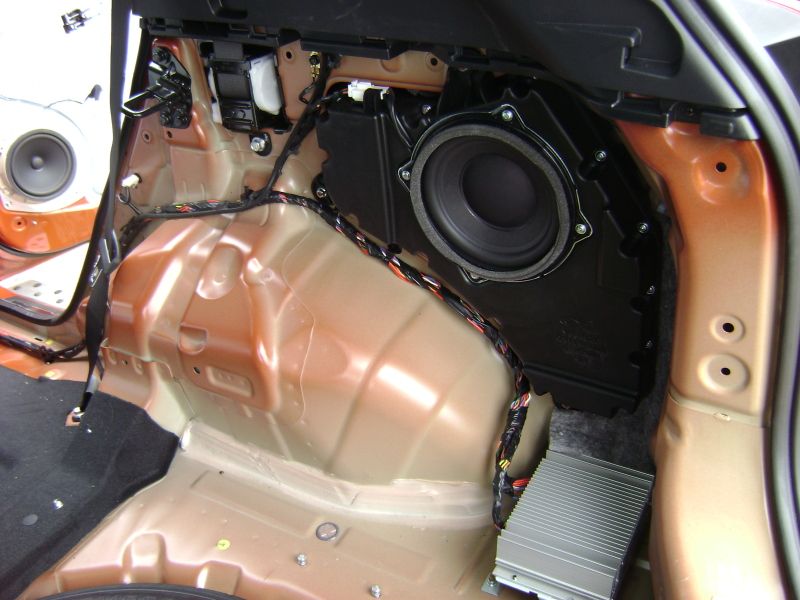
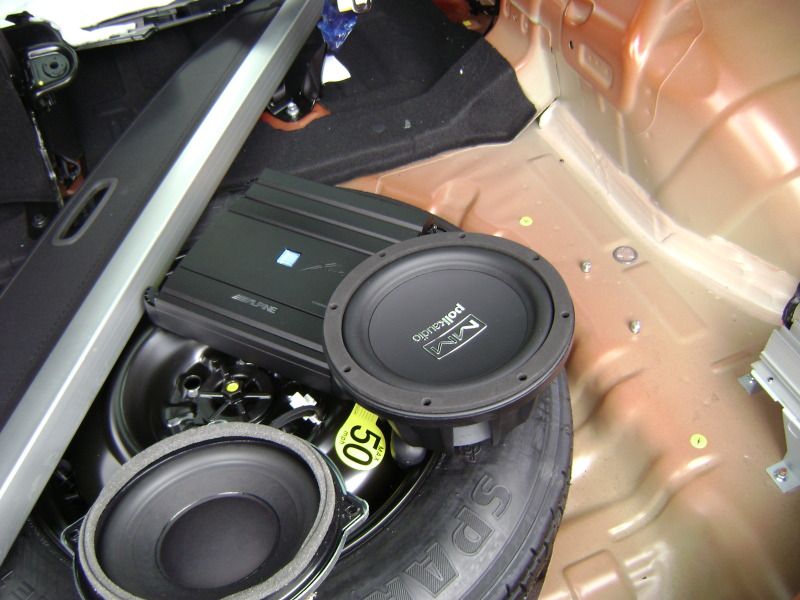
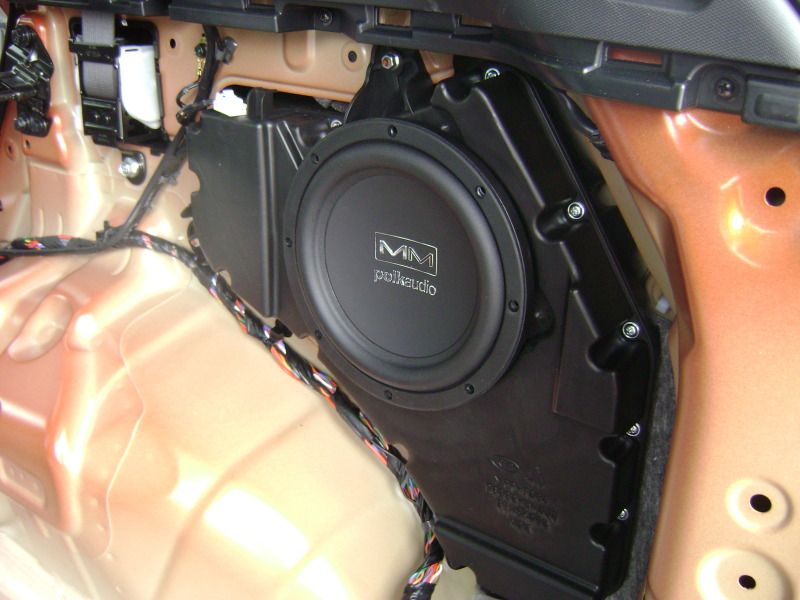
Off the amp and on the speaker end, the two corresponding positive and negative wires have been twisted together. You can find wiring diagrams online, but I still think mine weren’t correct. To wire, wired up all my speakers to the amp and tested each set of wires coming off the amp to determine which wires were left and right, and which carried which frequencies. I used a track that had different guitar parts coming out of the left and right speakers to help with this. Once I had the amp wires figured out I wired all the treble to input 1 on my line out converter, the mids to input 2 and the lows to input 3. I used the summing feature and set the jumpers inside the line out converter to sum all channels. Wire up your line out converter to your amp with RCA’s. From that point I set the fader on the stereo to each channel individually (front left, front right, etc) to have my channels correspond to how I wanted them on my amplifier. It was literally a guess and test procedure. After this, the amp and line out converter are done. I cut a hole in the Styrofoam tray to run the wires to my amp and LOC. I used Velcro to hold down the amp and LOC, no issues so far, they seem very solid. Although I have cleaned it up further, here is the initial picture of the “final” installation.
Image


I think that pretty much covers everything. I may have left some stuff out, but I’m sure you guys will ask.

:)
 
#23 ·
This job ended up taking me 3 days!

I could have had it all done in about 8 hours if I knew the wiring better and had the line out converter, which I didn't. The second day was pretty much wasted trying to figure out ways to wire it, none of which worked.

I did save a bit of time by coaxing the girlfriend to help lay down Dynamat :)
 
#22 ·
With how little I push the new amp, I doubt heat will be an issue. I will monitor it for a while, right now the only ventilation is the hole I made in the styrofoam to run the wires. It is a decent sized hole but doesn't "flow" air. If it becomes a problem, I will look at installing computer fans like someone else here did, but I doubt it will be.
 
#26 ·
Nice, Now comes the big question? How the !!$!$%@#$ does it sound? Does the sub rattle the box apart?

Again Im in the process of buying a new house and think I'm gonna wait until then to install all of the rest of my Alpine stuff (Sub amp,4ch amp,8 inch alpine woofer,etcc..) I hat looking at it in the garage..LOL

At least i have the Front/Rear speakers in and they do sound alot better than stock!

Im glade to see that polk fit into the stock box.. Im gonna make sure I dynamat it to help reduce rattling/vibratation. That stock box isnt the best to use but I guess I will find out.

Did you have any engine noise/wine? :lol:
 
#28 ·
The sound is 100% better. Everything is more full and crisp. The bass is not too overpowering, but then again I don't have the bass cranked on the amp gain, or on the head unit. I only noticed a slight vibration in the back from the sub, but it's not bad and I haven't bothered to track it down. The vibration could be caused by either the panel that covers the subwoofer/cargo area, or the rear tail light, not sure which. In terms of volume, this stereo is almost too loud. I don't think I have turned it up all the way yet as it just starts to sound like noise to me (same thing you get when going to a metal show at a concert, it's just so loud you can't make out all the notes lol).

I did apply a lot of Dynamat to the sub box and a bit of area surrounding it. I also did apply it around the speakers in the doors, and around the speaker area of the door panel as well. I get no vibrations from the doors whatsoever.

I bought the bulk kit for my Dynamat, so I still have about 6 or 7 sheets left if I so choose to use them.