Kia Forum banner

HID installation into 2015+ sedona w/ Halogen headlights

25K views 29 replies 8 participants last post by  rougeben83  
#1 · (Edited)
DIY: HID installation into 2015+ sedona w/ Halogen headlights

After seeing a couple of threads asking about aftermarket lighting in the stock halogen headlights, I decided to share my experience with putting HID ballasts in our vans. I'm not an expert, but I have done my fair share of HID "retrofits" in several vehicles, including full HID projector installations in headlight housings.

To begin, Kia chose an interesting way to mount the H7 bulb in the headlights; rather than the usual metal retainer to directly lock the bulb in place w/ a separate socket to power the bulb, they chose to use a plastic socket with integrated "holder" for the bulb - this assembly would then be locked into the projecter housing. This presents a couple of packaging problems as 1) you have to either cut or retain the bulky plastic holder with the HID bulb/capsules, 2) have to modify aftermarket HID capsules with a separate plastic retainer, and 3) are limited to HID capsules or LED bulbs with flexible heatsinks if you want to keep the factory headlight cover.

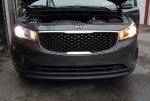
Now that's out of the way, onto the pictures. 1)First, is the stock low-beam (right) vs. HID (left) - I chose 4300k temp.

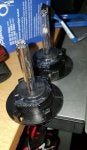
2)You'll need to a basic H7 HID kit (w/ capsules and ballast) as well as the plastic holders to allow them to go inside the projector - the latter are readily available on Ebay for about $5 - search Kia K6 headlight holders. Make sure they are this shape.

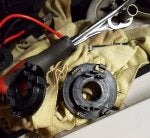
3) You will need to attach the H7 capsule/bulb onto the holder - given how my H7 capsule was bundled with a silicone plug and ballast power wires, I chose to cut a slit in the holder to get the capsule in the center.

4)Line up the H7 capsule tabs on the holder and use high-temp silicone adhesive to bond it into place

5) drill a 1" hole into the OEM rear bulb cover and make sure to cut the back ribs flush so the silicon plug can fit snugly; you can buy a second set from KIA for about $14 each.
 

Attachments

#2 ·
6) Test fit of the HID plug inside the rear headlight cover. To ease installation, it's best to NOT have the rear cover installed on the plug while you're trying to slide the capsule inside the projector; run the plugs and wires through the hole inside the rear cover AFTER you finish everything inside the headlight assembly.

7)Time to install the HID capsule inside the the headlights. Some tips:

-makes sure the capsule glass is clean and grease free
-the aftermarket holders are more flimsy than OEM - make sure all 4 tabs lock into place and is securely installed in the projector. Initially, I was wondering why my beam pattern and light output were way off when I first installed them, it turned out the holders did not seat properly and came loose after I buttoned everything up.
-if you chose to keep the OEM socket/holder inside the headlight assembly, there is enough room to slide it under the capsule.

8) I chose an easily- reversible installation. Insert the wiring harness for the ballast into the OEM socket/holder - HID ballast are polarity sensitive, test fire the ballasts to make sure your wires are oriented properly before wrapping the wires in electrical tape.

9) Slide the HID wires through the hole in the rear cover, fit the silicone plug around the hole and refit the rear cover to the back of the headlight. You can mount the ballast where ever you like, depending on what you have. I chose slim ballasts with a separate igniter module - these were securely mounted to the underside trim of each headlight assembly.

**IMPORTANT** the stock headlight wiring is terrible - I had severe flickering issues when the ballasts were fully powered up. You have 2 options - run an separate relay harness for the HID (being triggered by the stock socket) or get capacitors to even out the voltage to the ballasts. For the purpose of this guide, I chose the capacitors ($10 at various retailers), however as I have a spare wiring harness, I plan to go with that when time allows.

10) Done.

11) headlight output.
 

Attachments

#3 ·
Beam pattern. Being a halogen projector, its not terrible, however you can see two focal points where each light concentrates (hotspots). Beam cutoff isn't the sharpest, but coupled with the diffused "squirrel catchers", glare is controlled. I lost the stock beam pattern pic, but its very similar to the HID. However, the limitations of the lenses KIA chose are much more apparent with the extra light output from HID's.
 

Attachments

#6 · (Edited)
Just an update. I've decided to keep the capacitors in place - there's no easy way to get reliable ground to a separate wiring harness for the headlights as the front radiator frame is bolted to the van via plastic (!) brackets. I would need to run wire outside of my loom to ground to the fender, leading to a less-than OEM looking install.

Also, in hindsight, you probably don't *NEED* to do step #3 in my walkthrough - I think with enough persuasion, one can push most of the plastic connectors through the hole in the K6 holder.

Finally, as an update, after 2 months, the headlights have been working perfectly with no misalignment or decrease in performance.
 
#9 ·
hi, i did this to a buddy of mine in his 2018 sedona, don't have to have a slit on that bulb holder, it will make the hid bulb go out of focus like the passenger side that you have..
or maybe have superglue between the bulb holder and the H7 HID base to make it stay while putting them in..
what i did on the base is to just have the female 9006 harness slip through by taking away the plastic that was encased with it or just trim the side..

Image

Image

Image
 
#19 ·
I just ordered this kit https://www.theretrofitsource.com/hid-systems-20/hid-systems-universal/h7-morimoto-elite.html
Image


Morimoto XB 35w ballasts with H7B 4500k bulbs. I opted for the CANBUS connector vs the relay setup. It's supposed to have some capacitors and resistors in it to eliminate flickering and bulb-out warnings.

Also picked up these H7 adapters from Amazon
https://www.amazon.com/gp/product/B078XBRPJ1/ref=oh_aui_detailpage_o04_s00?ie=UTF8&psc=1
They look like the ones kobi411 used, so I hope they work.

I'm going to attempt this at first without removing the front bumper and headlights. If that doesn't go as planned, I guess I'll be spending some time taking off the bumper. I've been able to successfully swap the OEM low beams for OSRAM nightbreakers, so it should work out fine.
 
#22 ·
Success!! Some parts were easier than I expected, others harder. Overall it wasn't too bad though.

I started by removing the front bumper cover. I wanted to be able to mount the ballasts to the body and not have to struggle getting the bulbs in. Just a few bolts and plastic retainer pins and it was off.

Image


Next it was time to fit the bulbs in the stock headlight housing. I bought some H7 conversion rings linked earlier in this thread. They didn't work without a little modifications. First, the H7 bulb didn't sit flush like they do in the OEM retainer.

Image


As you can see, the one on the right doesn't let the H7 bulb sit right. The one on the left has been modified already. What I had to do was grind three small tabs with a Dremel. I marked what needed to be cut in silver Sharpie. The center hole needed to be widened a bit as well to fit the largest plug coming from the HID bulb.

Image


Here's what the plug looks like fitting through the hole. I took off a retaining clip from the plug so it was a little smaller.

Image


limited to 4 images per post. See next post for more.
 
#23 · (Edited)
Next step was grinding off one of the fins from the rear headlight cap.

Image


Once that's done, I drilled a 7/8" hole with a step bit and ground a little more for the tabs on the large plug mentioned earlier.

Image


I ran all the wires through that hole and fit the rubber gasket. It doesn't sit completely flush on the outside, but seals nicely on the inside.

Image


Image
 
#24 ·
Here's where I mounted the ballasts, after pre-drilling the screw holes.

Image


Here's what it looks like after reinstalling the headlight. It's pretty well hidden and out of the way.

Image


Tested before reinstalling the bumper cover. I actually tested all the new stuff before removing the bumper cover and headlights, but it never hurts to do it again.

Image


The bumper cover went back on as easily as it came off.

Image
 
#25 ·
I went with the 35w 4500k kit. I knew the light was going to be more yellow than the LED positioning lights, but according to what I've read, 4500k is the brightest color in terms of lumens.

Image


I was feeling good about how well this turned out, so I went around back and did some debadging. Waiting on some black new-style K logo emblems with red carbon fiber inlay. I think I need to do something about that chrome horizontal trim piece above the license plate. It's either going to be matte black or Snow White Pearl.

Image
 
#26 ·
I'm glad there are more people trying this mod. It helps for future owners looking into doing the same upgrade.

Just an update, after 1 year of ownership, the HID's are still doing fine. No degradation in light output, the same cannot be said for the upgraded halogen highbeams, which have started to dim slightly even with just occasional use in that position (not surprising as that's how most of these upgraded halogen bulbs work).
 
#30 ·
You don't need to remove the headlight housing to change the bulbs. The only advice I have about mounting the ballast somewhere is ease of access and replacement; I wouldn't want to have to take off a bumper cover or jack up the van to do that.

Year 3 update - it's still working, have about 25k miles on them since making this thread.